Embedding The Livble Widget & Experience
Learn how to embed the Livble Widget & Experience using the SDK
💻 Code Snippet
The following snippet demonstrates how to use the Livble SDK to embed the widget and experience in your tenant portal.
Next, we'll go over each parameter used to configure the SDK, widget, and experience.
import { LvbleWidget, Environment, openExperienceAndSetToken } from "@lvble/react";

<LvbleWidget
    balance={100000}
    pms={"your_portal_name"}
    externalId={"test-tenant-id"}
    onEvent={(eventType, data) => {}}
    environment={Environment.Production}
    signature={"3cfa76ef14937c1c0ea519f8fc057a80fcd04a7420f8e8bcd0a7567c272e007b"}
    onWidgetClickCallback={() => {
      	const token = "...";  // Call Livble's API to get the token. (POST /tenant/portal_info/:id)
        openExperienceAndSetToken({token: token});
    }}
/>
import { Environment, Lvble } from "@lvble/core"
const l = Lvble({
balance: 100000,
pms: "your_portal_name",
externalId: "test-tenant-id",
onEvent: (eventType, data) => {},
environment: Environment.Production,
signature: "3cfa76ef14937c1c0ea519f8fc057a80fcd04a7420f8e8bcd0a7567c272e007b",
onWidgetClickCallback: () => {
const token = "..."; // Call Livble's API to get the token. (POST /tenant/portal_info/:id)
l.openExperienceAndSetToken(token);
}
});
const widget = l.createWidget()
yourWidgetContainerElement.appendChild(widget); // Add widget to DOM
Widget Size RestrictionsAs mentioned before, the widget will adapt its size and layout based on its container.
The only restrictions are:
- Min width:
320px- Min height:
250px
👁️ Parameters Overview
A high-level overview of each parameter. More in-depth guides are available for relevant parameters.
| 🏷️ Name | 📝 Description | ✍️ Notes |
|---|---|---|
balance |
The tenat's current balance in cents. For example: a balance of $1520.12 should be passed as 152012 |
|
pms |
A unique identifier for your portal. Provided along with your Livble API keys. |
|
externalId |
A unique identifier for the tenant. | ⚠️ Important Please use the tenant ID, not a lease ID. |
onEvent |
A callback function that receives events emitted by the Livble SDK. | 📖 Jump here for more info |
environment |
Defines the environment mode in which the SDK operates. | Possible values are:Sandbox | Production |
signature |
Hex-encoded HMAC_SHA256 signature.Used to verify the tenant's identity inside the widget. |
📖 Jump here for more info |
onWidgetClickCallback |
A callback function triggered when the widget is clicked. This function should retrieve a tenant token from Livble's API and use it to open the Livble Experience. |
📖 Jump here for more info |
🔒 HMAC Signature
The HMAC signature is used by Livble to verify the tenant's identity in the widget.
It is a hex-encoded HMAC-SHA256 signature, generated like so:
HMAC_SHA256(key=$LIVBLE_API_KEY, msg="$PMS+$EXTERNAL_ID")
Below are code snippets for generating the HMAC signature in different languages:
import * as crypto from "crypto";

const PMS = "your_portal_name";
const LIVBLE_API_KEY = "your_livble_api_key";

function generateTenantHmac(externalId: string): string {
  const hmac = crypto.createHmac("sha256", LIVBLE_API_KEY);

  const message = `${PMS}+${externalId}`;
  hmac.update(message);

  return hmac.digest("hex");
}
import hmac
PMS = "your_portal_name"
LIVBLE_API_KEY = "your_livble_api_key"
def generate_tenant_hmac(external_id: str) -> str:
message = f"{PMS}+{external_id}"
tenant_hmac = hmac.new(
key=LIVBLE_API_KEY.encode("utf-8"),
msg=message.encode("utf-8"),
digestmod="sha256",
)
return tenant_hmac.hexdigest()
import javax.crypto.Mac;
import javax.crypto.spec.SecretKeySpec;
import java.nio.charset.StandardCharsets;

public class HmacUtil {
    private static final String PMS = "your_portal_name";
    private static final String LIVBLE_API_KEY = "your_livble_api_key";

    public static String generateTenantHmac(String externalId) throws Exception {
        // Construct the message to sign.
        String message = PMS + "+" + externalId;

        // Convert message and key to bytes.
        byte[] messageAsBytes = message.getBytes(StandardCharsets.UTF_8);
        byte[] keyAsBytes = LIVBLE_API_KEY.getBytes(StandardCharsets.UTF_8);

        // Compute SHA256 HMAC.
        Mac mac = Mac.getInstance("HmacSHA256");
        mac.init(new SecretKeySpec(keyAsBytes, "HmacSHA256"));
        byte[] hmacBytes = mac.doFinal(messageAsBytes);

        // Convert HMAC to a hex string.
        StringBuilder hex = new StringBuilder();
        for (byte b : hmacBytes) {
            hex.append(String.format("%02x", b));
        }
        return hex.toString();
    }
}
using System;
using System.Security.Cryptography;
using System.Text;
public static class HmacUtil
{
private const string Pms = "your_portal_name";
private const string LivbleApiKey = "your_livble_api_key";
public static string GenerateTenantHmac(string externalId)
{
// Construct the message to sign.
string message = Pms + "+" + externalId;
// Convert message and key to bytes.
byte[] messageAsBytes = Encoding.UTF8.GetBytes(message);
byte[] keyAsBytes = Encoding.UTF8.GetBytes(LivbleApiKey);
// Compute SHA256 HMAC and convert it to a hex string.
using (var hmac = new HMACSHA256(keyAsBytes))
{
byte[] hmacBytes = hmac.ComputeHash(messageAsBytes);
return BitConverter.ToString(hmacBytes).Replace("-", "").ToLower();
}
}
}
What You Need To Know
LIVBLE_API_KEYis the same API key you use to make requests to Livble's APIPMS(Portal Name) is a constant provided along with your API key. (See in parameters table)- You can cache this signature in a persistent store so you don't compute it every time your FE loads
- ⚠️Always generate the HMAC signature in your backend to avoid exposing your API key.
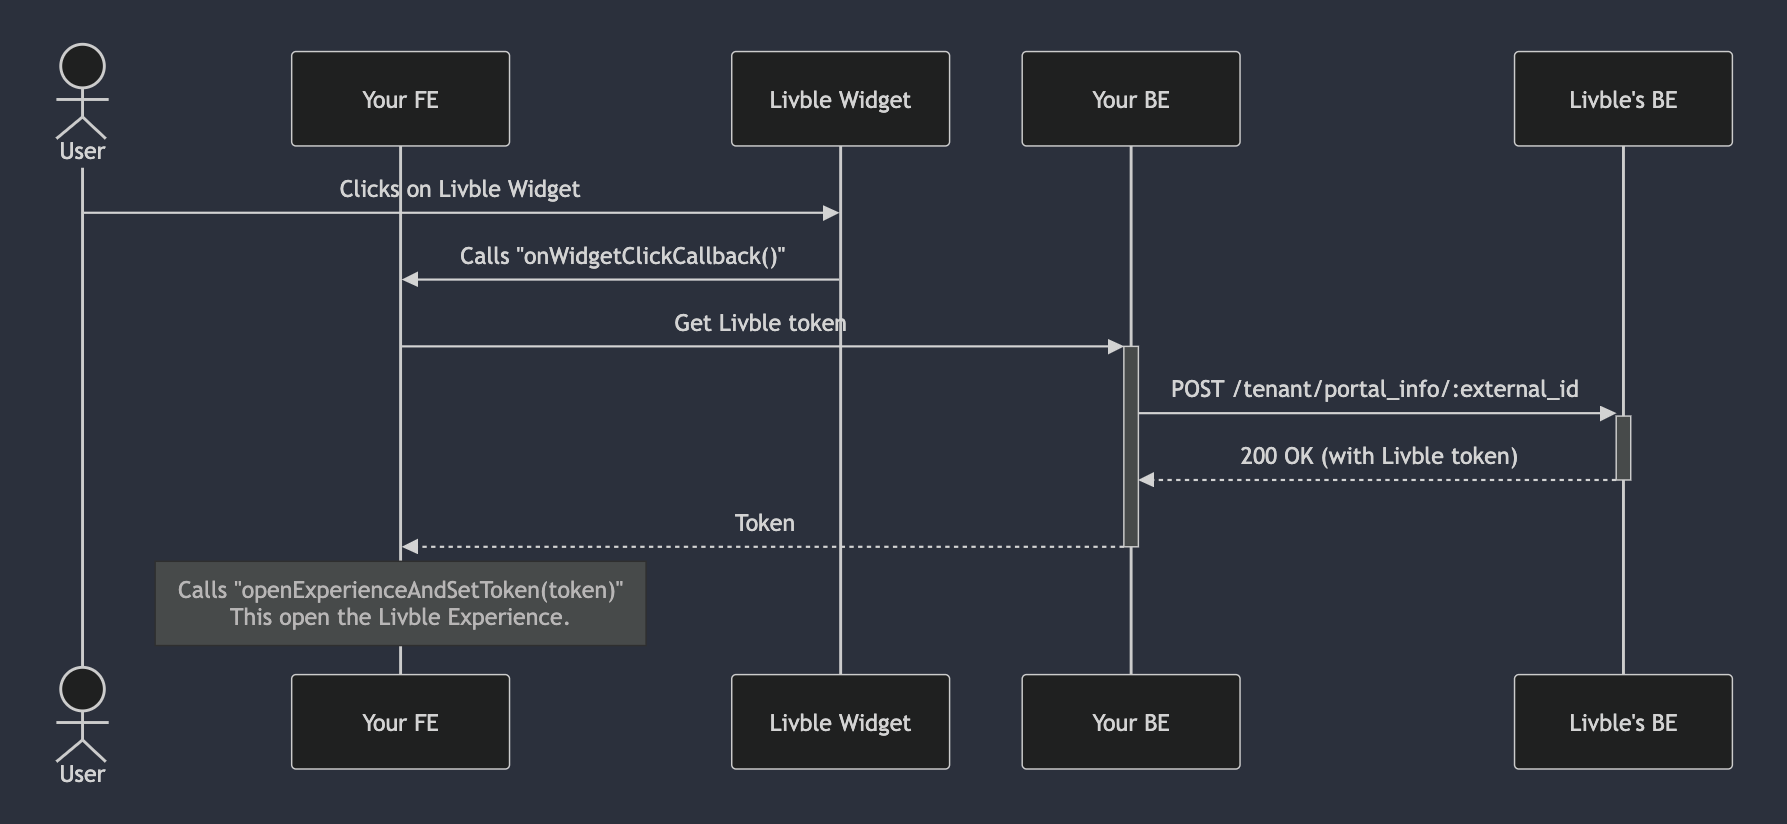
🚀 Launching the Livble Experience on Widget Click
💡 Overview:
When the Livble Widget is clicked, the onWidgetClickCallback is called.
This function is responsible for opening the Livble Experience.
Custom Implementation RequiredThe
onWidgetClickCallbackfunction is not provided by the Livble SDK.
You must define and implement it in your frontend application.
🛠️ What Should onWidgetClickCallback Do:
onWidgetClickCallback Do:- Make a call to Livble's API
POST /tenant/portal_info/:external_idendpoint (see API reference) - Extract the Livble token from the response.
- Use the Livble SDK's
openExperienceAndSetToken(token)method to launch the Livble Experience.
(The method signature may vary slightly between React and Vanilla JS implementations.)
API Key SecurityThe
POST /tenant/portal_info/:external_idcall must be made from your backend.
This is because it requires the Livble API key, which should not be exposed in the frontend.
🔄 End-to-End Flow: From Widget Click to Experience Launch